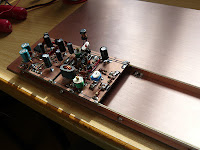
First I want to start my blog with a special thanks to my radio friend PA1SBM.Alex was so kind to put some nice comments on his blog.Just like me,Alex is also building a Bitx20 and has some other interresting things to tell on his blog.Pay him a visit on PA1SBM. Since I`ve been out of the country for two weeks,it was time to do some work on my Bitx20 V3 project.The plan is to put all the modules onto a larger piece of double side copper circuit board.I put the modules on a rail,so they are 5mm above the main board.I can now later do some wiring under the modules,so you won`t see.On the pictures you see the projekt until now.An S-meter and the knobs from an old CB-radio.
![]()

Here some pictures how the modules are positioned on the 5mm rail.
 |
| After I de-soldered all the modules I`ve put the first module (Audio module) on the big board.Here you have a good look on the two 5mm rails. |
 |
| Two modules on the rail,BFO/Mixer module. |
 |
| Detail of the rail. |
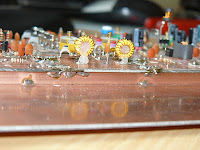 |
| And another detail of the rail,this time you can see the bandpass filter in close up. |
 |
| View from the top.The two potentiometers for the volume and for the VFO fine adjust.The empty hole is for the tuning capacitor.Maybe later I will replace the tuning capacitor with a varactor with a 10 turn 10K potentiometer.Also the S-meter from an old Danita CB radio is in the front. |